Installing a new toilet might seem like a daunting task, but with the right guidance and preparation, it's a manageable DIY project that can save you hundreds of dollars in professional installation fees. Whether you're replacing an old, inefficient toilet or installing one in a new bathroom, understanding how to install a toilet properly ensures optimal performance and prevents costly water damage down the line.
Many homeowners and property managers face the challenge of toilet replacement due to aging fixtures, frequent repairs, or bathroom renovations. While professional installation guarantees expert results, learning the proper techniques empowers you to handle future maintenance and emergency situations with confidence. This comprehensive toilet installation guide will walk you through each step of the process, from preparation to final testing, ensuring your new fixture operates flawlessly for years to come.
Tools and Materials Needed
Before beginning your toilet installation project, gathering the proper tools and materials is essential for a smooth, efficient process. Having everything readily available prevents unnecessary trips to the hardware store and ensures you can complete the installation in a single day.
Essential Tools Required:- Adjustable wrench set (10-inch and 12-inch recommended)
- Screwdriver set (both flathead and Phillips head)
- Level (at least 24 inches for accurate measurements)
- Utility knife for cutting materials
- Plunger for initial testing
- Measuring tape
- Safety glasses and work gloves
- Putty knife for cleaning surfaces
- Hacksaw (if pipe cutting is necessary)
- New toilet (tank and bowl assembly)
- Wax ring with plastic flange
- Toilet bolts (closet bolts) and washers
- Water supply line (braided stainless steel recommended)
- Toilet seat and mounting hardware
- Plumber's putty or silicone caulk
- Shims for leveling if needed
Visit reputable home improvement stores or plumbing supply retailers for the best selection of toilets and installation materials. Consider factors like water efficiency ratings, bowl height, and flushing mechanisms when selecting your new toilet. Many suppliers offer package deals that include all necessary installation components, ensuring compatibility and potentially saving money. Professional-grade wax rings and supply lines, while slightly more expensive, provide superior durability and leak prevention compared to basic alternatives.
Preparing for Installation
Proper preparation forms the foundation of successful toilet installation. This critical phase involves safely disconnecting utilities, removing existing fixtures, and ensuring your workspace is clean and ready for the new toilet.
Shutting Off Water Supply:Locate the water shut-off valve behind the toilet, typically positioned on the wall or floor near the base. Turn the valve clockwise until completely closed, then flush the toilet to drain the tank and bowl. If water continues flowing, the valve may need replacement before proceeding. Remove any remaining water using a sponge or wet vacuum to prevent spills during removal.
How to Remove a Toilet Safely:Disconnect the water supply line from the toilet tank using an adjustable wrench. Remove the decorative caps covering the closet bolts at the toilet base, then unscrew the nuts securing the toilet to the floor. Rock the toilet gently side to side to break the wax seal, then lift straight up to remove both tank and bowl as one unit. Have a helper assist with lifting, as toilets typically weigh 80-120 pounds.
Inspecting the Toilet Flange:Examine the toilet flange (the circular fitting connecting the toilet to the drain pipe) for cracks, corrosion, or damage. The flange should sit level with or slightly above the finished floor surface. If the flange is damaged or positioned too low, replacement or repair is necessary before installation. Check that the closet bolt slots are intact and properly aligned.
Cleaning and Surface Preparation:Thoroughly clean the flange and surrounding floor area, removing all traces of the old wax ring and debris. Scrape away any remaining wax using a putty knife, ensuring a clean, smooth surface for the new wax ring. Inspect the floor for any soft spots, water damage, or unevenness that could affect toilet stability. Address any flooring issues before proceeding with installation to prevent future problems and ensure a professional-quality result.
Installing the New Toilet
The installation phase requires careful attention to detail and proper sequencing to ensure a watertight, stable connection. Following these steps methodically will result in a professionally installed toilet that operates reliably.
Positioning the Wax Ring:Place the new wax ring on the toilet flange with the tapered side facing up. Ensure the ring is centered on the flange opening and sits flat against the surface. Some installers prefer placing the wax ring on the toilet horn (the outlet at the bottom of the toilet bowl) instead of the flange. Either method works effectively when done properly. If your toilet flange sits below floor level, consider using an extra-thick wax ring or a wax ring with an integrated plastic funnel for better sealing.
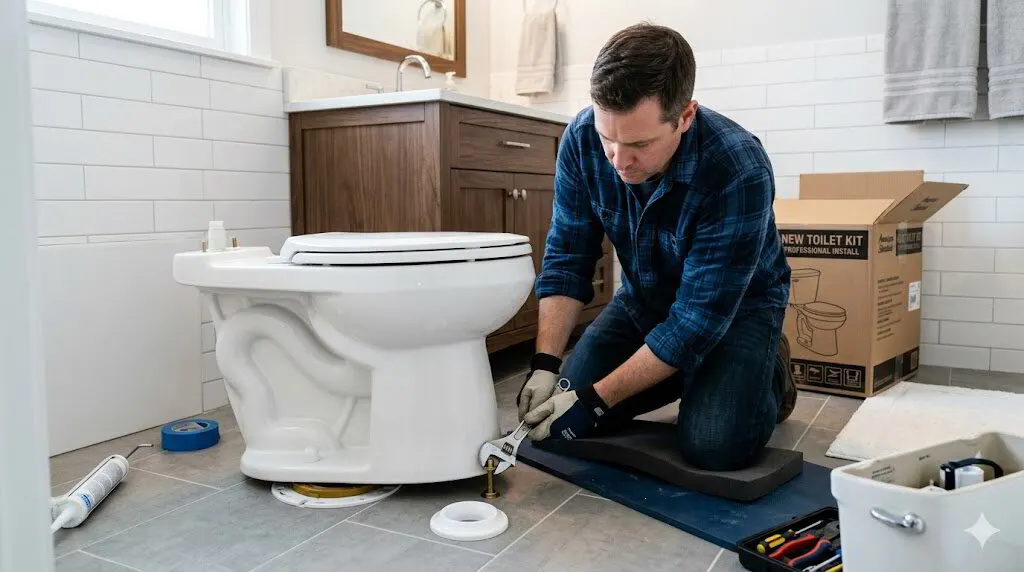
Setting the Toilet Bowl:Insert new closet bolts into the flange slots, ensuring they're positioned parallel to the wall behind the toilet. Carefully lower the toilet bowl onto the flange, aligning the bolt holes in the toilet base with the closet bolts. The toilet horn should slide directly into the wax ring without shifting or tilting. Once positioned, press down firmly on the toilet bowl while rocking slightly to compress the wax ring and create a proper seal.
Securing and Leveling:Place washers and nuts on the closet bolts, tightening gradually and alternately to maintain even pressure. Avoid over-tightening, which can crack the toilet base. Use a level to check that the toilet sits evenly in all directions. If the toilet rocks or appears unlevel, insert plastic shims between the base and floor at low points. Trim excess shim material with a utility knife after achieving proper stability.
Connecting Water Supply:Install the toilet tank if using a two-piece model, following manufacturer instructions for proper alignment and bolt torque specifications. Connect the water supply line to the toilet tank inlet, ensuring the connection is hand-tight plus one-quarter turn with a wrench. Avoid over-tightening flexible supply lines, as this can damage the internal sealing components. Position the supply line to avoid kinking or stress on the connection points.
Final Adjustments:Turn on the water supply valve gradually, checking for leaks at all connection points. Allow the tank to fill completely, then adjust the water level if necessary using the float mechanism or fill valve settings. The water level should be approximately one inch below the rim of the overflow tube. Install the toilet seat according to manufacturer instructions, ensuring proper alignment and secure mounting.
Testing the Installation
Thorough testing ensures your toilet installation meets professional standards and will provide reliable service. This critical phase identifies potential issues before they become costly problems requiring extensive repairs.
Initial Leak Detection:With the water supply restored, carefully inspect all connection points for signs of moisture or dripping. Check the base of the toilet where it meets the floor, looking for water seepage that could indicate wax ring failure. Examine the water supply connection at both the shut-off valve and toilet tank inlet. Even minor leaks can cause significant damage over time, so address any moisture immediately.
Water Level Adjustment:Proper water levels in both the tank and bowl ensure optimal flushing performance and prevent common toilet problems. The tank water level should rest about one inch below the overflow tube rim, providing adequate flushing power without waste. If the water level is too high, adjust the float mechanism or bend the float arm downward. Low water levels may require float adjustment upward or fill valve replacement.
Comprehensive Flush Testing:Perform multiple flush cycles to verify proper operation and drainage. Each flush should completely evacuate the bowl contents and refill to the appropriate level within 60-90 seconds. Listen for unusual sounds like continuous running, gurgling, or grinding that could indicate adjustment needs or component problems. Test the flush handle for smooth operation and proper return to the rest position.
Long-term Performance Verification:Conduct extended testing over several hours, flushing periodically and monitoring for any changes in performance or new leaks. Check that the toilet remains stable and doesn't rock or shift during use. Verify that the wax ring seal maintains integrity by inspecting the base area after multiple flushes. Document any adjustments made during testing for future reference and maintenance planning.
These toilet plumbing tips ensure your installation will provide years of trouble-free service while maintaining water efficiency and preventing costly repairs.
Common Mistakes to Avoid
Understanding frequent installation errors helps ensure your toilet installation project succeeds the first time. These mistakes can lead to leaks, instability, and premature component failure, requiring costly repairs or complete reinstallation.
Wax Ring Installation Errors:The most critical mistake involves improper wax ring placement or reusing old wax rings. Never attempt to reposition a toilet after the wax ring has been compressed, as this breaks the seal and requires wax ring replacement. Using the wrong size wax ring for your flange configuration can create gaps that allow sewer gases and water to escape. Always use a new wax ring for each installation, regardless of the old ring's apparent condition.
Improper Toilet Securing:Over-tightening closet bolts represents a common error that can crack the toilet base, requiring expensive replacement. Tighten bolts gradually and evenly, checking for toilet stability without excessive force. Conversely, under-tightening allows toilet movement that can break the wax seal over time. The toilet should feel solid and stable without any rocking motion when properly secured.
Water Supply Connection Problems:Cross-threading supply line connections or using excessive force damages threads and creates leak points. Hand-tighten connections first, then use a wrench for only the final quarter-turn. Using old, deteriorated supply lines with new toilet installations often leads to premature failure and water damage. Always install new, high-quality braided stainless steel supply lines for maximum reliability and longevity.
Flange and Floor Preparation Oversights:Failing to properly clean the flange area or ignoring damaged flooring creates installation problems that worsen over time. Address all floor damage, loose subflooring, or flange issues before installing the new toilet to prevent future complications and ensure professional results.
When to Call a Professional
While learning how to install a toilet empowers homeowners with valuable DIY skills, certain situations require professional expertise to ensure safety, code compliance, and long-term reliability. Recognizing these scenarios helps prevent costly mistakes and potential property damage.
Complex Plumbing Modifications:If your installation requires moving plumbing lines, installing new drain connections, or modifying existing rough-in dimensions, professional plumbers possess the expertise and licensing required for these alterations. Structural modifications often require permits and inspections that DIY installations cannot provide. Additionally, if your toilet flange requires replacement or repair, especially in concrete floors, professional tools and techniques ensure proper installation.
Recurring Installation Problems:When multiple DIY plumbing attempts result in persistent leaks, instability, or performance issues, professional diagnosis can identify underlying problems that aren't immediately apparent. Experienced plumbers recognize subtle signs of drain line problems, foundation settling, or code violations that require specialized solutions beyond basic toilet replacement.
Time and Expertise Considerations:Property managers and landlords often find professional installation more cost-effective when considering time investment, warranty coverage, and liability protection. Professional installations typically include guarantees on both labor and materials, providing peace of mind for commercial applications. For homeowners uncomfortable with any aspect of the toilet installation process, professional services eliminate stress and ensure optimal results.
K and K Plumbing's Comprehensive Services:Our experienced team handles everything from basic toilet installations to complex bathroom renovations, ensuring code compliance and long-term performance. We provide transparent pricing, emergency services, and ongoing maintenance support for all plumbing needs throughout Ohio.
Conclusion
Successfully completing a toilet installation project requires careful planning, proper tools, and attention to detail throughout each phase of the process. This toilet installation guide has provided comprehensive steps for removing old fixtures, preparing the installation area, and properly installing your new toilet with professional-quality results.
Understanding how to install a toilet empowers homeowners, landlords, and property managers with valuable skills while providing insight into when professional assistance becomes necessary. The key to success lies in thorough preparation, using quality materials, and taking time to properly test your installation before considering the project complete.
Remember that toilet maintenance tips and regular inspections help extend the life of your installation and prevent common toilet problems before they require major repairs. Whether you choose to tackle this project yourself or hire professionals, understanding the installation process helps ensure optimal results and long-term satisfaction.
Ready for Professional Toilet Installation? Contact K and K Plumbing Ohio at 330-875-8003 for expert toilet installation, bathroom remodeling plumbing, and comprehensive plumbing services. Our experienced team provides transparent pricing, emergency support, and guaranteed workmanship for all your plumbing needs. Visit https://kandkplumbingoh.com/ to schedule your consultation today and discover why Ohio homeowners and property managers trust us for reliable, professional plumbing solutions.
Have a question about this topic? Contact K & K Plumbing or call 330-875-8003 for a free estimate.